|
 Part I of this series discussed where to buy basic parts and
examined three of them: a breadboard, resistors, and potentiometers. This entry
focuses on learning about the rest of the necessary basic parts to complete the
future projects: capacitors, light-emitting diodes (LEDs), and a battery and
battery holder. Supplemental tools will also be discussed in this entry. Part I of this series discussed where to buy basic parts and
examined three of them: a breadboard, resistors, and potentiometers. This entry
focuses on learning about the rest of the necessary basic parts to complete the
future projects: capacitors, light-emitting diodes (LEDs), and a battery and
battery holder. Supplemental tools will also be discussed in this entry.
Capacitors
There are many different kinds of capacitors, but some will
be encountered more often than others when working with breadboards; these
include electrolytic, tantalum, and ceramic capacitors.
Electrolytic & Tantalum Capacitors
These capacitors are
polarized, which means that you have to be careful which way you insert them
into the circuit. Most of these capacitors are labeled with a "+" (usually seen
on tantalum capacitors) or a "-" (usually seen on electrolytic capacitor, which
also have a differentiating color bands). These symbols denote which wire lead
is the positive or negative lead. For example: The electrolytic capacitor in
the image to the right has a negative sign (looks like a hollow square) on the
top of it, which means that the upper lead is negative.
Ceramic Capacitors
These capacitors are shaped like disks (usually a yellow-tan
color) and do not have a polarity, which means that it does not matter which
way they are inserted into the breadboard. These may be the easiest to use as a
beginner.
Light Emitting Diodes
(LEDs)
There are two different kinds of light emitting diodes to be
concerned about. 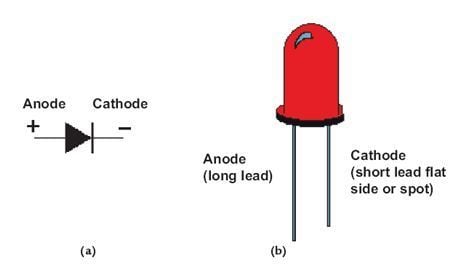 Bipolar LEDs are can be inserted in any orientation into a
board. These LEDs will be called o Bipolar LEDs are can be inserted in any orientation into a
board. These LEDs will be called o ut specifically as bipolar. Using LEDs that aren't
bipolar need a bit of caution when inserting into the board (see image at
right). As displayed in the picture, the line on the schematic corresponds to the wire lead on the
flat side of the LED bulb. Eventually, the leads to an LED may be cut, which
will make figuring out the polarity of the component by the length of the lead
a futile effort. In the diagram, (a) represents the schematic representation of
a LED, in addition to the image to the left. ut specifically as bipolar. Using LEDs that aren't
bipolar need a bit of caution when inserting into the board (see image at
right). As displayed in the picture, the line on the schematic corresponds to the wire lead on the
flat side of the LED bulb. Eventually, the leads to an LED may be cut, which
will make figuring out the polarity of the component by the length of the lead
a futile effort. In the diagram, (a) represents the schematic representation of
a LED, in addition to the image to the left.
Precautions must be taken when using LEDs, as when they are
connected directly to power they can get hot and burn up (resulting in a broken
LED). The circuits presented in this
project series will have this in mind so that the LEDs will not be "dropping
like flies". If further exploration of LEDs is done individually, be forewarned
that using a resistor may be necessary to keep the component from breaking.
Battery and Battery Holders
The easiest battery holder to use would most likely be the
9V battery holder. Keeping a 9V battery and holder handy for these projects
would be a wise decision. These holders are also cheaper. If AA or AAA battery
holders are preferred, go ahead and purchase them, but they tend to be more
expensive as they often need a plastic contraption (think of the plastic
containers needed to secure these types of batteries in electronic toys) to
hold the batteries securely in place.
Supplementary Tools
Wire and Wire Cutters
Wire is a staple among circuit builders. Wire can be found
in a variety of places. The kind best for circuitry is insulated and only has
one thread. There are now kits available with precut wires designed for
breadboards, for those who fear the hassle of cutting wires constantly. But for
those who have no fear of cutting wires, wire cutters are also important. There
are many different kinds, but a simple one will suffice, so don't go overboard.
Needle-Nosed Pliers
Small needle-nosed pliers are a godsend when a piece of wire
gets stuck in the board. They are also handy in putting in and taking out wires,
especially when the leads are being finicky. Sometimes even the smallest
fingers are too big to place wires with ease. These can also be used to
straighten out leads that have been bent numerous times.
Below is a composition of some example components from Radio Shack. It does not matter where components are bought from, as long as they work!
6" Modular IC Breadboard Socket - $14.99
500-Piece 1/4-Watt Carbon-Film Resistor Assortment - $12.99 ($.02598 per resistor)
20 Assorted LEDs - $2.99 ($.1495 per LED)
Fully Insulated 9V Battery Snap Connectors (package of 5) - $1.99
Solderless Breadboard Jumper Wire Kit - $5.99
Part III will start to teach the reader how to figure
out the value of the components. It will also briefly go over the schematic
representation of the various components.
Previous Blogs in Series:
Electronic Projects for Beginners – Components (Part I)
| 


 Re: Electronic Projects for Beginners – More Components (Part II)